Monday, September 24, 2007
Boy's Set


After making ponchos for four sisters, I was stumped by the question of what to make for their brother. I decided on a hoodie sweater, and have it half made. Unfortunately, the front, back and sleeve that is done, don't seem to line up properly. Rather than making the last sleeve and hood and hoping for a miracle, I decided to make something else that I know I could finish without disaster.

I decided on a scaled down version of my Racer Cap pattern (I started with 10 stitches instead of 11 in the beginning round, and had just 60 stitches per round for the checkerboard section). It turned out well. I then made a little scarf to match, and I think the set is cute.

Since the girls are all getting ponchos, I would have preferred a sweater for the boy, but with the move almost upon me, and little crochet time between all the packing, this set allowed me to make something that works and that I hope a four year old boy might like. And who knows. When time allows, I'll try and finish that hoodie. Maybe I can make it work.

This set and the four ponchos were made for a special family and will be donated to Marine Corps Kids.


All my heads are packed, I'm ready to go

I hate packing. I hate moving. I'm really not very good when it comes to change, but we're moving soon!
In all honesty, while I hate the process of packing and moving an unpacking, this is going to be good. We're ready to get out of Florida and start something new. I have a great new job, and we'll be closer to family.
There are a couple of very very dear friends here, who I will miss more than I can stand. The thought of being far from them has me in tears now, but I know that our friendship is stronger than miles. This will be a good thing, and a great new start.
There is no denying it. When a crocheter packs her heads, a move is happening soon.


Wednesday, September 19, 2007
Pretty in Pink Poncho


Here is the fourth poncho in the series.


All of these where made using Aggie May's Baby Poncho Pattern.
All of these will be donated to Marine Corps Kids for the special request family.
The pink and orange ponchos follow the pattern, but were made with 2 strands of yarn and an M hook - these were made for the six year old girls. I gradated the color from light to dark for a gradual color change effect. The green baby poncho follows the pattern exactly and should fit the one year old. For the red, I increased the length of my starting chain - this should fit the four year old.
Now I'm off to fine a prefect pattern for something for the little boy.


Tuesday, September 18, 2007
Sunny Side Up Poncho

I just finished poncho #3. This is for one of the six year old girls. I used the same pattern as that for the younger girls, but this time I used two strands of yarn and gradated the colors from white to orange. I think it's bright and sunny, and even though it is an open design, it should be warm.
On to poncho #4!


Monday, September 17, 2007
Poncho #2

I just finished Poncho #2. This one is for the 4-year old. Of course, once again, I have no idea if it is sized properly for a 4 year old. It seems to be proportionally larger than the poncho for the one year old. With any luck, it will fit.


Saturday, September 15, 2007
My first poncho

Well, not my first - my mom made me one when I was very little, but this is the first that I've made. The pattern is by Aggie May and it works up remarkably quickly and easily. I improvised a little cap to match.


My only problem is that I made this for a one year old, and I have no idea if the size is right. I don't have a one year old handy to test it on, so while it looks ok, it could be way too big, way too small or way out of proportion to the cap. I decided that I could fret about it, or just eyeball it and if it doesn't fit, it will be cute for a doll - a large doll.


This set will be donated for the special request by Operation Marine Corps Kids.


Friday, September 14, 2007
Peace, Love and Blankies!

This "Love Bug Blankie" was made with soft fleece and my edgerydoo. It was a fun one to make. I edged the square with single crochet using Caron Simply Soft Brights in yellow, blue and green. Then I joined them with the flat braid method, and edged the entire blanket with a row of DC shells in bright pink.

I think it is fun!

This blanket will be sent as part of the special request for Operation Marine Corps Kids.


Saturday, September 08, 2007
Mile High Hookin' Club


Honestly, I don't know how I survived flying before I began crocheting! Flights are so long and boring, and a hook and a skein of yarn make the time "fly by". This week I went out of town, and it was a great opportunity to get some caps made on the plane.


I started off making the multi-colored scrap cap. I had been collecting a lot of tiny balls of yarn, and this was a great way to use up the scraps while making a fun and cheery chemo cap. This cap is just rows of DC using whatever colors I had available.

Then, a family with two young kids came and sat right in front of me. The kids were adorable, but the 2 year old was being quite vocal about the fact that she did "not like this!". I did what any responsible hooker would do. Switched hooks and made the little flower cap to give to her. It might not make her like flying, but it couldn't hurt. In the end, she put on her headphones, watched a movie and was a great little flyer! By the time I was done with the cap, she was having so much fun, that I couldn't get her attention to give it to her. That's ok, I'll donate it to Operation Marine Corps Kids, where some little girl may like it.


Finally, I had time to make the 3-color version of my Racer Cap. I must admit that I just love this one. The red cap with the black and white check make me think Nascar. Might have to try it in a bright yellow version too!

The Scrap Cap and the Racer Cap will be donate to Roswell Park Cancer Center.

You don't need to have a long flight to be an active hooker!


Wednesday, September 05, 2007
A special project for Operation Marine Corps Kids
Just wanted to help get the word out about this.


Blue Cheetah Cub
This is another fleece blanket and hat set that I made with EdgeryDoo. I used my super-simple edging pattern for the blanket and just improvised the hat with a ribbed cuff.

This set will be donated to Operation Marine Corps Kids.


Tuesday, September 04, 2007
Embrace-a-doo, make one for you!


I crochet just about every day - mostly charity projects and gifts. I almost never make anything for myself. For the first time, I have a project on my "to-do" list that's just for me!
When I fly, I am always freezing on the planes. I immediatly look for the blankets and grab one. I can get by without a pillow, but I just hate being cold. I know many people who are skeeved out by airline blankets and think they're dirty and gross. I never let it bother me - it's not like I put them in my mouth - I just like to keep warm.
Well, yesterday I flew, and the blanket just stank. It really needed to be laundered. I was freezing so I used the blanket, but it was the first time that it bothered me. When I was done with the blanket, it got folded and put back in the overhead for the next passenger. I have no idea how often those things get laundered.
That's when I decided that I needed to make myself a traveling Embrace-a-doo. It will keep me warm when flying, and I can launder it as much as I choose. If I use a thin fleece it will be warm enough to do the job, and small enough to roll into a tight ball and carry in my crochet bag.
I'm flying again later this week, and wish I could make one tonight. Unfortunately, the only fleece that I have right now is in baby patterns. I need to find a nice neutral fleece that is very thin so I can fold it up and take it with me.
I designed this to be a shawl for patients while they convalesce, but I really think it will serve well as a travelling blanket too!


Monday, September 03, 2007
Cancer Awareness - September


The American Cancer Society posts a calendar for Cancer Awareness.

Cancer is a devastating disease that can effect all of us: men and women, young and old, every race, background and economic group. The disease does not discriminate.

The month of September has been designated as awareness month for many forms of cancer:

September 2007
National Ovarian Cancer Month
Childhood Cancer Month
Gynecologic Cancer Awareness Month
Prostate Cancer Awareness Week (Sept. 16-22)
National Prostate Cancer Awareness Month
Leukemia and Lymphoma Awareness Month
Take a Loved One for a Check-up Day (Sept. 18)

Being aware of our bodies and of the warning signs can save lives.

September 18th is Take a Loved One for a Check-up Day. I'm posting now in the hope that readers will call their doctors and make an appointment - if not for the 18th, for another day soon. Early detection and treatment is so crucial, and regular check-ups and screenings are a great way for us all to be proactive.

The cap above features a lavender ribbon for general cancer awareness. I will be donating this cap to Roswell Park Cancer Institute in Buffalo, NY.


Racer Cap

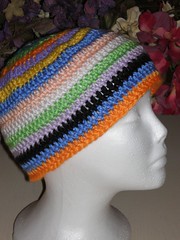
Racer Cap, by Wormie


2 (or 3 - see variations) colors of worsted weight yarn (I used Caron Simply Soft)
H hook for teen/small adult size, I hook for large adult size


Using main color
Chain 5, slip stitch in first stitch to form a loop.


Row 1: chain 3 (counts as first DC), 10 dc in loop, slip stitch to top of chain 3 to join (11 dc)

Row 2: ch 1, 2 dc in same stitch as the chain 1, 2 dc in each stitch around (22 dc)

Row 3: ch 1, 1 dc in same stitch as chain 1, 1 dc in next stitch, 2 dc in next stitch. Follow this pattern around, slip stitch to top of first dc to join (33 dc)

Row 4: ch 1, 1 dc in same stitch as chain 1, 1 dc in next 2 stitches, 2 dc in next stitch. Follow this pattern around, slip stitch to top of first dc to join (44 dc)

Row 5: ch 1, 1 dc in same stitch as chain 1, 1 dc in next 3 stitches, 2 dc in next stitch. Follow this pattern around, slip stitch to top of first dc to join (55 dc)

Row 6: : ch 1, 1 dc in same stitch as chain 1, 1 dc in next 4 stitches, 2 dc in next stitch. Follow this pattern around, slip stitch to top of first dc to join (66 dc)

Rows 7-10: ch 1, 1 dc in same stitch as chain 1, 1 dc in each stitch around, slip stitch to top of first dc to join (66 dc)

Row 11: ch 1, 1 dc in same stitch as chain 1, 1 dc in next 2 stitches, change to contrast color, dc in next 3 stitches in contrast color, change back to main color. Continue alternating colors for 3 dc each all the way around the hat, slip stitch to top of first dc to join (you should end with your contrast color – do NOT change colors)

Row 12: with contrast color ch 1, 1 dc in same stitch as chain 1, 1 dc in next 2 stitches, change to main color and dc in next 3 stitches, change back to contrast color. Continue alternating colors for 3 dc each all the way around the hat, slip stitch to top of first dc to join (you should end with your main color – do NOT change colors)

Row 13: ch 1, 1 dc in same stitch as chain 1, 1 dc in next 2 stitches, change to contrast color, dc in next 3 stitches in contrast color, change back to main color. Continue alternating colors for 3 dc each all the way around the hat, slip stitch to top of first dc to join (you should end with your contrast color) change back to your main color and slip stitch to top of first dc to join. Cut your contrast color and weave the end in as you work row 14.

Row 14: with main color only - ch 1, 1 dc in same stitch as chain 1, 1 dc in each stitch around, slip stitch to top of first dc to join (66 dc)

Row 15: with main color chain 1 and sc in the same stitch as joining. SC all the way around the hat. Slip stitch to join and finish off.


Variations:

2-color edge

- after row 13, do NOT cut off your contrast color – let it hang inside your work
- work row 14 as instructed above
- for row 15, pick up your contrast color, and work the row of sc all the way around the edge switching off between the two colors (one stitch in main color, the next in contrast color) This gives a nice pop of color to the edge of the hat.
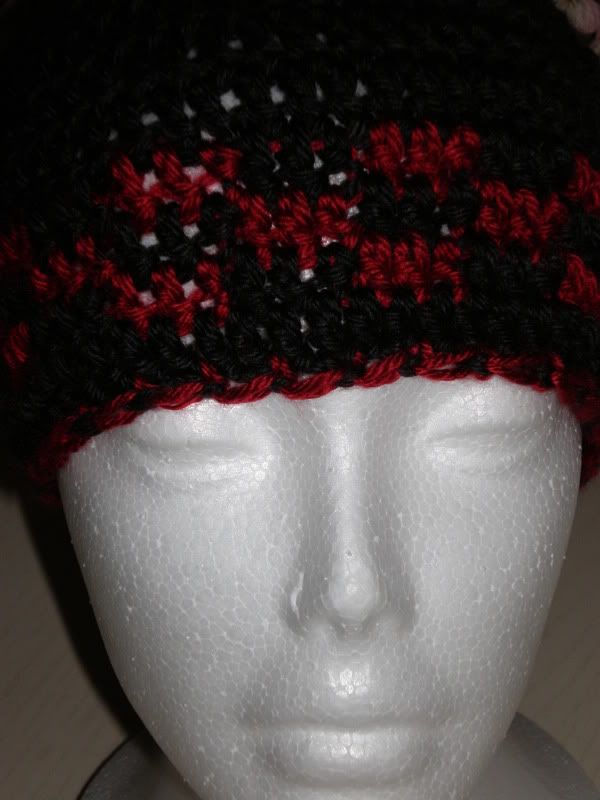
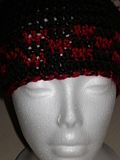
3-color cap -
Use 3 colors to make the cap.
Do rows 1-10 in your main color
For the checkerboard pattern in rows 11-13, follow the instructions above, but use 2 contrast colors
Use the main color for row 14
Do the 2-color edging variation for row 15 using both contrast colors.
I think this looks great when the cap is made in red with a black and white checkerboard design.

Hints – when doing the checkerboard pattern, do not cut the yarn – carry the unused color working it into the back of the stitches. You can find instructions on how to work over the unused color at Crochet Kim’s site. Her instructions are for single crochet, but you want to do the same thing when working the Racer Cap in DC.

If you lay your 2 color skeins on a table, you can switch colors without wrapping the two colors around each other, and there is no need for bobbins. I have done this hat quickly, without taking care to now wrap my yarns, and more carefully, making sure to keep the yarns from tangling – it is MUCH easier to work without tangles.

This is an original copyrighted pattern. You may use it for personal or charity use. Please do not post this pattern elsewhere, but feel free to link to it here.


footer2.JPG